Bridging two wireless routers involves configuring both networks manually. Visit each network location - which should be recognized by your computer automatically - and configure the appropriate Service Set Identifier (SSID), Wireless Encryption Protocol (WEP) or WiFi Protected Access (WPA) key and authentication information. Make sure you know the SSID and WEP or WPA key ahead of time.
Tuesday, March 8, 2011
Add “Hide File Names” Option in “View” Menu in Windows Vista
Guys with this 4 simple steps you can add Hide File Names Option in View Menu in your widows Vista...... this trick works only with Windows Vista.
1. Open a folder, in which you want to add this option. If you want to add this option in all folders, then open the parent folder. e.g. if you want to add the option in every folder of E: drive, then open E: drive.
2. Right-click on a blank area in the folder and select “Customize This Folder". You can also get this option from “View -> Customize This Folder.
3. It’ll open “Customize” tab. Now select “Pictures and Videos” option from “Template” drop-down box.
NOTE: If you want to add the option “Hide File Names” to a particular folder then make sure to un-check the option “Also apply this template to all subfolders“, otherwise enable this option.
4. Now Apply it and see the magic.
Now you’ll get an extra option “Hide File Names” in “View“. Which can hide file/folder names in that particular folder.Actually in Windows XP we can hide file/folder names by pressing key and selecting “View -> Thumbnails“. Since they hv removed “Thumbnails” option from “View” menu, I think thats why this option was added to folders having their templates as “Pictures and Videos”.
How to Avoid Having Your AdSense Accout Banned for Click Fraud
If you trawl through the AdSense message boards you can’t help but come across tales of woe from AdSense publishers that have had their account banned by Google.
Below is a list of ways people have been banned from AdSense and information on how to avoid it happening to you.
Don’t click on your own ads
The obvious one but still people do it. Google has the IP address of the computer/s that you’ve used to create and check your AdSense account. If it sees that this IP address clicks one of your ads you’re in trouble.
Don’t do it. It’s theft. Not from Google but from the AdWords advertisers.If you want to go to a site advertised by one of your ads don’t click on it look at the URL of the advertising site at the bottom of the ad and type it into your browser.
If you click on one accidentally (which does happen) you’re probably be ok but it’s worth dropping a quick email to Google with an explanation and apology
Don’t log in to AdSense from a shared computer.
As I said above Google keeps a record of every machine IP address used to look at your account. If you check your stats on a machine then someone else clicks on your ads from the same machine Google sees this as click fraud. Worth bearing in mind when thinking of checking your stats from somewhere like an Internet Café.
Don’t log in to your AdSense account from work.
Apart from getting in trouble with the company that employs you there’s also a further real risk. Most companies use a proxy server to access the Internet. A proxy server with ONE IP ADDRESS. Therefore you checking your ads from work means this proxy IP address being recorded by Google as one that you use. Problem is if there are 1000 people in your company it is the same IP address for them too. Google can’t differentiate between you and the other 999 employees in your company. If one of these 999 clicks on one of your ads it’s ban time.
Don’t get into a ‘I’ll click your ads if you click mine’ agreement with another Webmaster.
As above Google will have your IP address and that of every AdSense publisher. If they see these IP addresses consistently clicking on each other ads it’s goodbye for both of you.
Don’t tell friends and family.
Telling friends and family about your money making websites can lead to problems. Even if you tell them not to click on your ads there’s always the chance that Auntie Maud will think it’s a good idea to make some extra money for her favourite nephew. 100 clicks later from the same visitor and your account is screaming ‘Click Fraud’.
Receiving clicks from illegal traffic
Check the AdSense TOS for sources of traffic that aren’t allowed by Google. These include methods like Traffic exchange, PTC advertising, Auto surf etc.
Do monitor your visitor and AdSense figures
Check your account at least once a day. If you see a massive spike coupled with a massive increase in Page CTR investigate using your visitor stats website. If you see it’s all come from the same IP address you could have been the victim of a malicious attack – inform Google via email and offer them access to your logs. AdSense between posts
AdSense have always stressed that the most effective position for ads are within content, so when I found out you can insert AdSense between posts directly via the LAYOUT, I immediately thought I could insert the ads in the middle of a post, which is impossible to do up to now. Unfortunately, that insert ads in between 2 posts, not in the midddle of a post, something I had been trying to do for a long time. You can actually do this by messing with the template. Refer to Incorporate AdSense within the content (click BACK button to get back to this page).
The way to do direct from Blogger LAYOUT it is very simple. Sign into Blogger, which will get you into the Dashboard with a list of all the blogs you have in that Blogger account. In the section for "Blog posts", usually in the middle of the LAYOUT (may be in a slightly different position if you use non-standard Blogger templates):
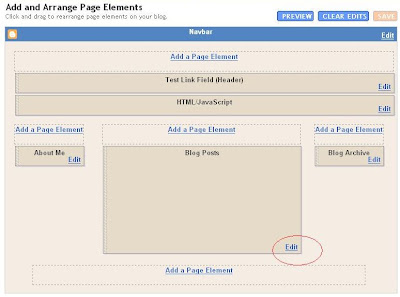
Click EDIT (highlighted with a red circle). You will get a "Configure Blog Posts" "pop-up".
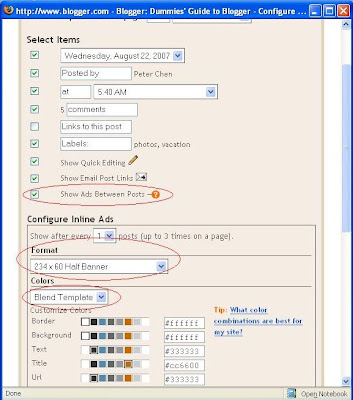
Tick "Show ads between posts", select your format by clicking on the down arrow or just leave it as the default half-banner and chose you ad colors or just leave it as the default "Blend Template" which is advisable (all 3 highlighted with red circles).
Then just scroll down and click "Save Changes". Now you don't have to worry about violating AdSense policy as this is done via cooperation between Google AdSense and Google Blogger. However, if you want the AdSense withing the post, you will still have to depend on the hack described in Incorporate AdSense ads within posts and wrap text around them (click BACK button to get back to this page.
The only thing to note is that if you had applied for your AdSense account direct from Blogger, there is nothing extra to do. If you have got your AdSense account via some other means, and this is the first time you are adding AdSense ads direct from Blogger, you may be asked to grant Blogger access to your AdSense account, which I believe is perfectly safe to do so.
One final thing. Just to make sure that the ads have the same publisher's ID, at the blog with the ads between posts, I click VIEW > PAGE SOURCE to see the page source of that webpage, and this is what I found:
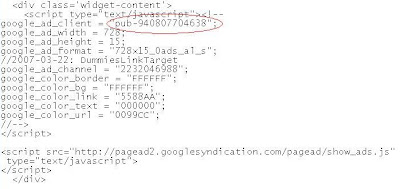
The "pub-12345....." was the same as my AdSense publisher ID (figure altered for security) thus assuring the ads displayed are actually "mine".
AdSense Tip: How to Increase AdSense CTR
An increase in CTR can mean a lot to AdSense Revenue. To increase AdSense revenue, you have to either increase the traffic or CTR. If somehow, you manage to triple your CTR just by tweaking the Google AdSense code, you can get three times more traffic. Here are a few tips for increasing your CTR.
Topics Covered in this Guide:
- What Google AdSense Engineers say about CTR- What Webmasters have concluded about CTR
- Traffic and its effects on CTR
- Experiments with CTR
What Google AdSense Engineers Say
- An email conversation with a Google Engineer:“Due to the dynamic nature of Google AdSense, fluctuations in your revenue will occur. Your earnings will depend on a number of factors, including the types of ads being served to your pages, the cost per click or cost per impression of these ads, and your users' click through selections. Regarding ad placement - the best ad format varies from page to page. We've observed that, in general, wider ads perform better because of their reader-friendly format. We strongly recommend putting your users first when deciding on ad placement. Think about their behavior on different pages, and what will be most useful and visible to them. You'll find that the most optimal ad position isn't always what you expect on certain pages.”
- Google Optimization Guide:
For example, on pages where users are typically focused on reading an article, ads placed directly below the end of the article tends to perform better. It's almost as if the users finish reading and asking themselves, “What can I do next?” Precisely targeted ads are just like answering their questions.
What Webmasters have concluded
Webmasters have diverse views on how to increase CTR. It largely depends upon the keywords you are targeting, look of your website, quality of its content, placement of AdSense ads, page optimization, and various other factors. Generally, AdSense blocks wrapped between the quality content works the best. For the websites having poor quality content, placing the Ads before the start of the content works well.
If you develop a poor quality content website, it will likely give you high CTR and clicks, but you will be getting low priced ads. Besides, nobody will like to add your URL to their favorites. However, if you have quality content that keeps the visitors glued, you may get low CTR, but you will be getting high priced ads and regular visitors.
If you develop a poor quality content website, it will likely give you high CTR and clicks, but you will be getting low priced ads. Besides, nobody will like to add your URL to their favorites. However, if you have quality content that keeps the visitors glued, you may get low CTR, but you will be getting high priced ads and regular visitors.
Proper positioning of ads on your website has direct impact on your CTR. Change the location of the ads and watch the changes in your CTR regularly. Try to locate the area of the page where the focus of the visitor can be. Generally, AdSense ads near the quality content or other crucial areas like navigation bar tend to perform better. But it really depends upon the keywords you are targeting, and the traffic you have.
The Traffic
AdSense comes after traffic. No traffic, no AdSense. Take good care of your traffic. Your visitors expect some valuable information from you. Make sure you are providing quality content to them. This will increase your visitors’ return back ratio. And only those visitors who are less targeted, will return to the content you are providing. More targeted users mean more CTR. 85% of my visitors add my website URLs in their favorites. And they do return.
Install a website stats monitoring software and regularly look at your web logs. Identify where exactly is the traffic coming from. Try to establish a pattern or relation between your AdSense stats and traffic stats. This will help you analyze the reasons for any marked deviations in the inflow of traffic. This will give you new ideas to develop traffic.
Experiments
Experiment and experiment a lot, till you are satisfied with the tweaks you have done to achieve the highest CTR. Track your page performance by making channels of ads in your AdSense Control Panel. Keep experimenting till you are satisfied with your CTR. Though, every such experiment will make you lose money for a day or two, as Google may take time to adjust with new changes, but it will be beneficial in the long run.
Set Processes Priority to processes in your system
Follow this tip to increase the priority of active processes, this will result in prioritisation of processes using the CPU.
CTRL-SHIFT-ESC
1.Go to the second tab called Processes, right click on one of the active processes, you will see the Set Priority option
2.For example, your Run your CDwriter program , set the priority higher, and guess what, no crashed CD’s
CTRL-SHIFT-ESC
2.For example, your Run your CDwriter program , set the priority higher, and guess what, no crashed CD’s
Saturday, March 5, 2011
Freeup or clean RAM using Notepad
system speed. Sometimes the process which have executed but are not required by the OS are stored on the RAM. So, we can remove or freeup the RAM with unused junk data to Speedup the System or processing speed.
We can clean the RAM just by using a Notepad application. This donot require any advanced software. The process to do so is as follows.
Open Notepad
Type
FreeMem=Space(64000000)
save it as “CleanRAM.vbs” on desktop
Note: Type the name of file along with inverted commas
Run the file and your RAM may be free.
Of course you can edit the code in the file for a greater “cleaning-progress”.
For example:
FreeMem=Space(1280000000)
FreeMem=Space(2560000000)
FreeMem=Space(5120000000)
FreeMem=Space(10240000000)
Install Windows xp in less than 15 minutes
Now, this tip will be very helpful for those who frequently install windows xp operating system. Normally OS installation takes around 40 minutes to complete, but through this trick you can now save 10-15 minutes. This simple tricks goes this way.
1. Boot through Windows XP CD.
2. After all the files are completely loaded, you get the option to select the partition. Select “c”.
3. Now Format the partition, whether it is normal or quick with NTFS or FAT
4. Once the formatting is completed, All the setup files required for installation are copied. Restart your system by pressing Enter.
Now, here begins the Simple trick to save 10-15 minutes.
5. After rebooting, you get a screen where it takes 40 minutes to complete or finalize the OS installation.
6. Now, Press SHIFT + F10 Key -> This opens command prompt.
7. Enter “Taskmgr” at the command prompt window. This will open Task Manager.
8. Click the Process Tab, here we find a process called Setup.exe -> Right Click on Setup.exe -> Set Priority -> Select High or Above Normal. Initially it will be Normal.
Thats it, no more work to do. Relax your self and see how fast the installation process completes
Hide text in notepad...
1. Open your command prompt Start–>Run and Type cmd
2. Type cd.. to move to C:\> drive or Type cd desktop to move to your desktop.
3. Type the code shown below in your command prompt
notepad filename.txt:hidden
eg:notepad ff.txt:hidden

4. Write some data and save(Ctrl+S) the file.
5. Browse to the file location and Open filename.txt
eg: ff.txt
you cannot see any data in the file.
6. To retrieve the hidden data open command prompt and type the same command.
notepad filename.txt:hidden
eg:notepad ff.txt:hidden
Monday, February 7, 2011
UNLIMITED DOWNLOAD in RAPIDSHARE
Wanna download more from Rapid Share???
here is a solution
-Go to page you want to download
-Select fre button in addres bar put "javascript:alert(c=0)"
-click OK on pop-up box
Now you can download unlimited information from RAPIDSHARE
Subscribe to:
Posts (Atom)